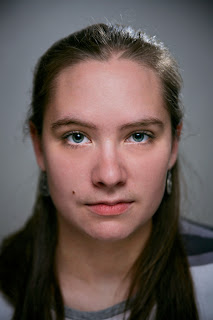
I was experimenting with the "butterfly" lighting effect and was pleased with the results. As far as post-processing I adjusted the exposure, curves, fill light, contrast, and white balance. I reduced the noise a tad to help soften the skin. Later I air brushed the skin and touched up the eyes by boosting the colors, whites, and sharpness. Next I removed blemishes and such. I also saturated the lips a smidgen. Then I adjusted the model's eyebrow and nose in the liquify filter. Enjoy:
 "Julianne" | 16 Oct 2011 7:40pm | living room
f/2.8 | 1/125s | ISO 100 | 75mm | Canon 5D mk1
 [original]
:: Replace Color ::
Though the edit is subtle, I did replace the stripes of the model's outfit to change from brown to more of a blue hue. This was done by using the Select -> Color Range tool in Photoshop and sampling the color and adjusting the fuzziness to refine the selection. Then I adjusted the hue.
Though the edit is subtle, I did replace the stripes of the model's outfit to change from brown to more of a blue hue. This was done by using the Select -> Color Range tool in Photoshop and sampling the color and adjusting the fuzziness to refine the selection. Then I adjusted the hue.


There's something about these portraits that I really like. To be honest, they remind me of magazine covers for Time or something like that. They really pull you in with the shallow depth and simplicity.
ReplyDelete