Friday, September 30, 2011

Non-Destructive Editing

The following images were edited in a non-destructive fashion. That means, any and all of the original pixels created from the camera were not lost when the post-processing is completed. The most popular and commonly used non-destructive edits within Photoshop are adjustments layers and smart filters...

:: Adjustment Layers ::

"Silver Lined" | 30 Sep 2011 7:56am | north Rexburg
f/4.0 | 1/800s | ISO 100 | 200mm | Canon 5D mk1


In this image I first added a texture image and blended. After reducing the opacity on that layer and masking out the horse by about 50%, I added a Color Balance adjustment layer. The horse was looking a bit too warm, mostly in the reds. After adjusting the color balance, I noticed that the scenery color prior to the that change was preferred so I masked our the color balance adjustment on the scenery. Lastly, I added a Levels adjustment layer, popping in some contrast and darkness. I masked out the majority of the Level adjustment to exaggerate the darker edges.

:: Smart Filters ::

"It's Real" | 30 Sep 2011 8:43am | north Rexburg
f/2.8 | 1/3200s | ISO 400 | 126mm | Canon 5D mk1


This image of a road-kill raccoon says quite the story. After making typical edits I added a layer of the image (so I wouldn't be altering the original layer). I wanted to make the image have a cartoonish look. I did so with the a Cutout filter effect, only after making that layer a smart object, so that any effect on it would be a smart filter. I then masked out the cartoon effect on the raccoon, illustrating to the viewer this is not fiction.

Flora & Fauna

The following images were taken to explore photographing animals and plants. I was curious to see what I could discover with an early morning light. Was happy with the results. Also, for some images I played a bit with blending a texture layer -- just for practice. Enjoy:

"Sunrise" | 30 Sep 2011 7:52am | north Rexburg
f/2.8 | 1/1000s | ISO 200 | 200mm | Canon 5D mk1

"Steady Stallion" | 30 Sep 2011 7:55am | north Rexburg
f/2.8 | 1/2000s | ISO 200 | 200mm | Canon 5D mk1

"Curious Workmanship" | 30 Sep 2011 8:05am | north Rexburg
f/2.8 | 1/6400s | ISO 400 | 75mm | Canon 5D mk1

"Lavender" | 30 Sep 2011 8:25am | Rexburg IDS Temple grounds
f/4.0 | 1/400s | ISO 100 | 75mm | Canon 5D mk1

"New Branch" | 30 Sep 2011 8:32am | BYU-Idaho Campus
f/4.0 | 1/250s | ISO 100 | 75mm | Canon 5D mk1

Monday, September 26, 2011

Blending and Type

:: BLENDING ::

The following images display a study on blending modes within Photoshop. This involves taking a distinct image and combining it with a more ambiguous, texture-like image. The blend mode that I decided to stick with was "Soft Light". I also did some minor adjustments to the final image with brightness/contrast and adjusting the levels. Enjoy:

"Dryland" | 24 Sep 2011 | Highland, UT
f/2.8 | 1/5300s | ISO 200 | 200mm | Canon 5D mk1

"Party Lights" | 24 Sep 2011 | Highland, UT
f/2.8 | 1/6400s | ISO 160 | 200mm | Canon 5D mk1


:: TYPE EFFECT ::

The following image I used to experiment with overlaying text onto the image. After editing the image as desired, I added the type layer and set the layer blend mode to "Overlay". This gives a pleasing transparent effect. I duplicated the layer to enhance the effect. Enjoy:

"Mr. & Mrs." | 24 Sep 2011 | Mount Timpanogos Temple, UT
f/2.8 | 1/400s | ISO 200 | 126mm | Canon 5D mk1


Color Study | Greens

The following images were created for the study of the color green. I learned that green comes in many hues. On one end of the spectrum, yellow is mixed in with the green color, and blue towards the other end. When I wanted to saturate, to me, the color green, I realized that I needed to saturated the yellows, which greatly helped the process. Enjoy:

"Lime" | 19 Sep 2011 | living room
f/22 | 1/160s | ISO 100 | 50mm | Canon 5D mk1
PP: curves, saturation, levels, bright/contrast, spot healing

"Bushes on Bank" | 19 Sep 2011 | North Rexburg
f/8.0 | 2 sec | ISO 400 | 70mm | Canon 5D mk1
PP: curves, saturation, levels, bright/contrast, spot healing

"Men in Green" | 24 Sep 2011 | Mount Timpanogos Temple, Utah
f/2.8 | 1/640s | ISO 200| 56mm | Canon 5D mk1
PP: exposure, curves, hue/saturation, bright/contrast, vignette

"Baby Green" | 22 Sep 2011 | living room
f/2.0 | 1/60s | ISO 800| 50mm | Canon 5D mk1
PP: exposure, fill light, saturation, bright/contrast, vignette

Friday, September 16, 2011

Cutouts | Full & Partial

The following images were used to explore Selecting within Photoshop.

:: FULL CUTOUT ::


"The Serve" | 18 Jun 2011 | BYU-I
f/2.8 | 1/6400s | ISO 320 | 200mm | Canon 40D

To select the tennis player, I first used the quick select tool and roughly selected the subject. Next, I made the brush size small and touched up the selection, adding and removing wanted and unwanted pixels. Then, I "refined selection" by softening the edge and adding a slight feathering. Lastly, I added a blank, white layer and placed the selected tennis player above the white layer.

:: PARTIAL CUTOUT ::


"Peacock" | 18 Jun 2011 | Idaho Falls Zoo
f/2.8 | 1/200s | ISO 200 | 175mm | Canon 40D

In order to create this partial selection, I first selected the rectangle selection tool and made my selection. I then created a new layer and deleted any content in the selection, making it white. Next I made that layer not visible. Then, I proceeded to selecting the peacock with the quick selection tool. I refined the selection and saved it. I created a new layer with the partial peacock and placed it above the white, rectangle layer, which I later made visible once again to complete the edit. Oh ... and I cropped it a bit and did a curve adjustment.

Wednesday, September 14, 2011

Past Photographic Experience

The following photographs are listed in order of date/time taken. I would consider them some of the most enjoyable and rewarding photographs that I have taken so far. There are many portraiture images that I have taken over the years, of which I am proud and do enjoy, but these seem to make me pause and observe a bit longer than my other images and say to myself, "Wait. I took these photographs?!"

Enjoy.

Warmly,
Ryan K.

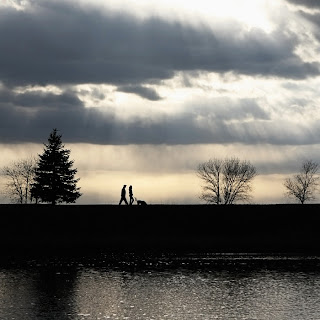
"Sunday Stroll" | 10 Apr 2010 6:31pm | Nature Park
f/8 | 1/1600s | ISO 200 | 56mm | Canon 40D
PP: square crop, boost contrast, incr. sharpness, adjust curve

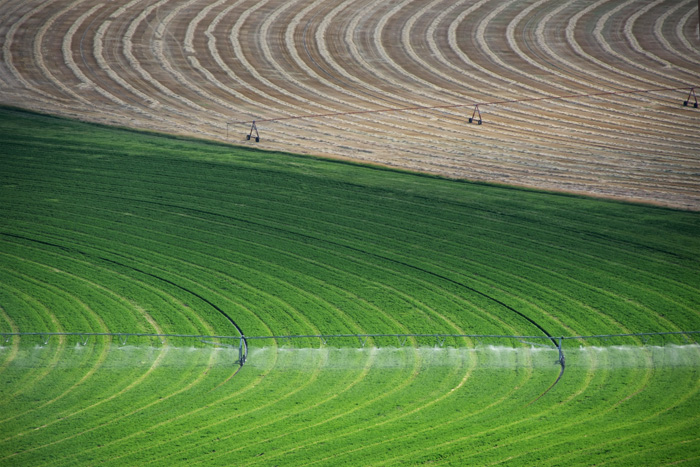
"Crop Circles" | 19 Aug 2010 5:32pm | R Mountain
f/5.6 | 1/400s | ISO 200 | 135mm | Canon 40D
PP: rotate image, adjust level, boost contrast, desaturated and lowered luminance in green channel, slight vignette

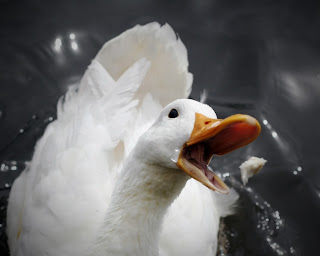
"Duck Hunt" | 6 Sep 2010 2:32pm | Nature Park
f/4 | 1/4000s | ISO 400 | 50mm | Canon 40D
PP: boost contrast, partially desaturated all color channels except orange

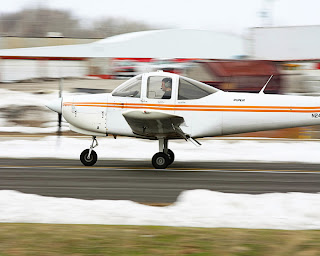
"Plane Panning" | 19 Mar 2011 10:09am | Rexburg Airfield
f/13 | 1/80s | ISO 100 | 200mm | Canon 40D
PP: boost sharpness, incr. saturation, slight warm

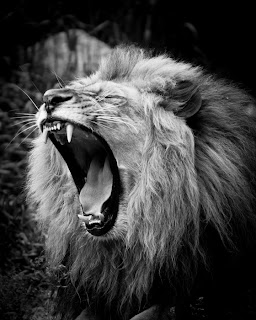
"Hear me ... Yawn" | 18 Jun 2011 1:15pm | Idaho Falls Zoo
f/2.8 | 1/400s | ISO 200 | 200mm | Canon 40D
PP: convert B&W, boost contrast & sharpness, strong vignette

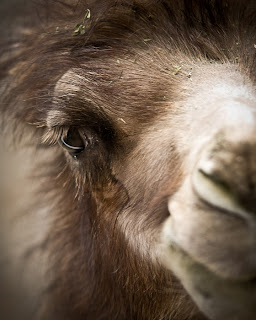
"Close Camel" | 18 Jun 2011 1:15pm | Idaho Falls Zoo
f/2.8 | 1/400s | ISO 200 | 135mm | Canon 40D
PP: adjst. level, boost contrast & sharpness, desat. browns, vignette

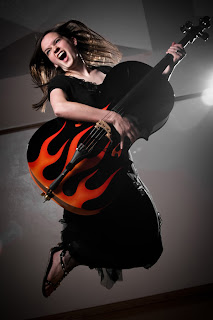
"Hello Cello" | 1 Jul 2011 6:03pm | Snow Building
f/3.2 | 1/200s | ISO 100 | 28mm | Canon 40D + off-camera flash (key light) w/ shoot-thru umbrella + off-camera flash (hair light)
PP: boost contrast, airbrush touch up, strong vignette

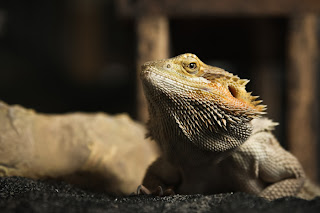
"Bearded Dragon" | 9 Jul 2011 7:45pm | Rexburg neighbor's house
f/4.0 | 1/200s | ISO 100 | 75mm | Canon 40D + off-camera flash w/ shoot-thru umbrella
PP: boost contrast & sharpness, slight desat, vignette

"Dripples" | 30 Aug 2011 12:31pm | kitchen table
f/2.8 | 1/3200s | ISO 400 | 75mm | Canon 40D + shutter remote trigger
PP: 1x3 crop, adjst white balance to cool, boost contrast & sharpness, touch up water surface, vignette

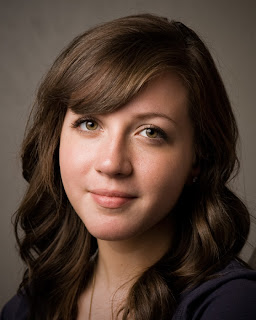
"Sister-in-law" | 4 Sep 2011 11:27am | living room
f/5.6 | 1/160s | ISO 100 | 68mm | Canon 5D mk1
PP: crop, warm, slight desat., touch up skin, boost eyes, slight vignette

The majority of these photographs were edited using Photoshop and a few with Lightroom. I typically boost contrast by adjusting the curves a bit (highlighting the lights, and lowering the darks), adjusting levels by raising the lower range to boost blacks, or simply adding a brightness/contrast adjustment layer. I very much try to make sure lines are parallel and perpendicular to the edges, unless when diagonals are intentional and obvious.

Kickoff

This blog will be used to showcase photographs and edits that I will take and do throughout this course.

Looking forward to explore, learn, and create!

Ryan K